Warning
Always start with a small test transaction. Bridge transfers are irreversible, so before moving large amounts, send a small amount first and confirm it arrives as expected.
The dedicated Bridge smart contract, controlled by the Gonka consensus, is active on Ethereum at the address:
0x972a7a92d92796a98801a8818bcf91f1648f2f68
Bridge via dashboard (UI guide)
The dashboard is the easiest way to bridge. It handles the key derivation for you (see Addresses and keys), so you don't need to import private keys or compute addresses by hand.
Tip
Prefer the dashboard if you are not comfortable with the CLI or with handling raw private keys. The step-by-step CLI flows are documented in Deposit USDT, Withdraw USDT, Deposit GNK, and Withdraw GNK if you prefer to do it manually.
What the dashboard does for you
- Derives the correct addresses. Connect the Ethereum wallet you bridge with, and the dashboard shows the matching
gonka1…address the bridge will deliver tokens to — so you always know where your wrapped tokens will land. - Warns about seed-phrase accounts. If you are using a wallet whose Ethereum and Gonka keys come from the same mnemonic, the dashboard detects this and warns you, because seed-derived accounts use different keys on each chain — so your Gonka wallet won't show the bridged tokens by default. You still control the receiving address (you can derive the matching key from the same mnemonic), but it requires an extra manual step. Read Addresses and keys for the full explanation.
- Shows your bridged balances in a Bridge Assets section, so you can confirm a deposit arrived.
- Reports chain status, so you can see if the chain is degraded before initiating a transfer.
- Prompts for bridge epoch updates when the Ethereum bridge is behind the Gonka chain. If you see A Bridge needs epoch update, click Update bridge to submit the missing epoch key. This is a normal Ethereum transaction, so the connected wallet pays gas. See Bridge epoch update.
Supported flows
The dashboard supports the full set of transfers without using the CLI:
- ETH Bridge — deposit any ERC-20 (USDT, USDC, WETH, …) from Ethereum to Gonka, or withdraw back to Ethereum.
- GNK Bridge — bridge native GNK to Ethereum as WGNK and back.
- IBC Bridge — transfer IBC-native tokens (e.g. USDT) between Gonka and connected Cosmos chains (Kava).
Processing time & fees
| Bridge type | Direction | Processing time | Gas paid in |
|---|---|---|---|
| ETH Bridge (ERC-20) | Ethereum → Gonka | ~15–20 min (waits for Ethereum finalization) | ETH |
| ETH Bridge (ERC-20) | Gonka → Ethereum | ~1–5 min | ETH |
| GNK Bridge | Gonka → Ethereum (mint WGNK) | ~1–5 min | ETH |
| GNK Bridge | Ethereum → Gonka (burn WGNK) | ~15–20 min | ETH |
| IBC | Kava → Gonka | ~1–3 min | KAVA |
| IBC | Gonka → Kava | ~1–3 min | GNK (0 fee) |
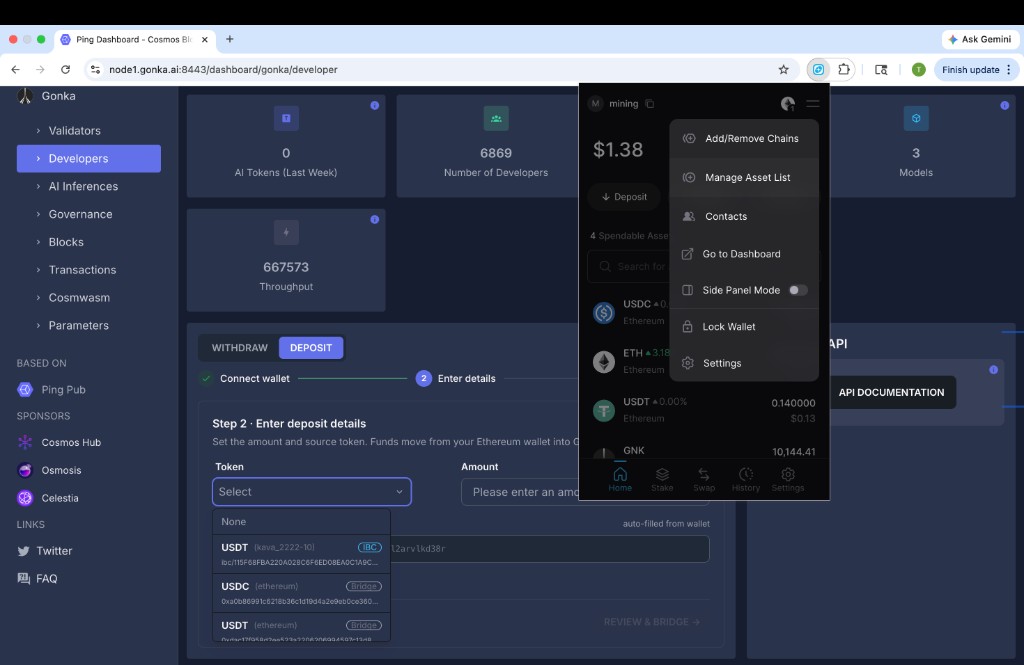
Deposit tokens to Gonka
This section walks you through depositing tokens to Gonka using the bridge widget. Select the token from the Token dropdown — the widget detects the bridge type automatically:
- ERC-20 tokens (USDC, USDT, WETH, …) and GNK (as WGNK) go through the Ethereum bridge.
- IBC tokens (USDT IBC, …) go through IBC to a connected Cosmos chain.
How ETH / GNK bridge deposits work
- Lock tokens on Ethereum — your tokens are sent to the bridge contract and locked.
- Validator signatures — Gonka validators observe the finalized Ethereum deposit and collect BLS signatures.
- Mint on Gonka — the wrapped tokens are minted on Gonka and delivered to your derived
gonka1…address.
How IBC deposits work
- Approve transfer in wallet — you sign an IBC transfer from the source chain (e.g. Kava).
- IBC packet relay — the packet is relayed to Gonka.
- Tokens arrive on Gonka — IBC tokens appear in your Gonka wallet.
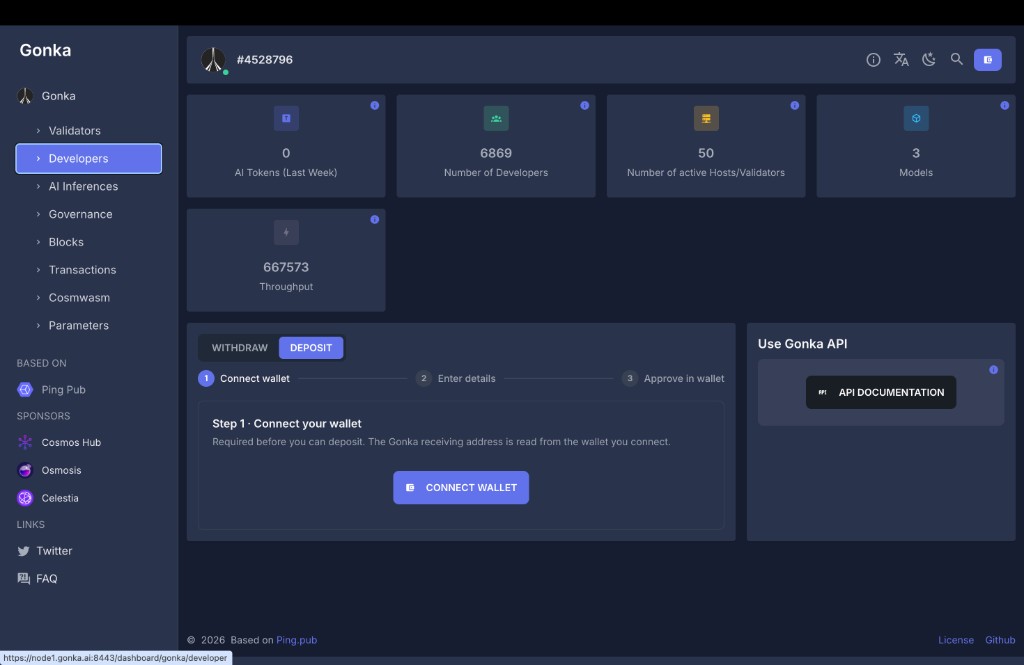
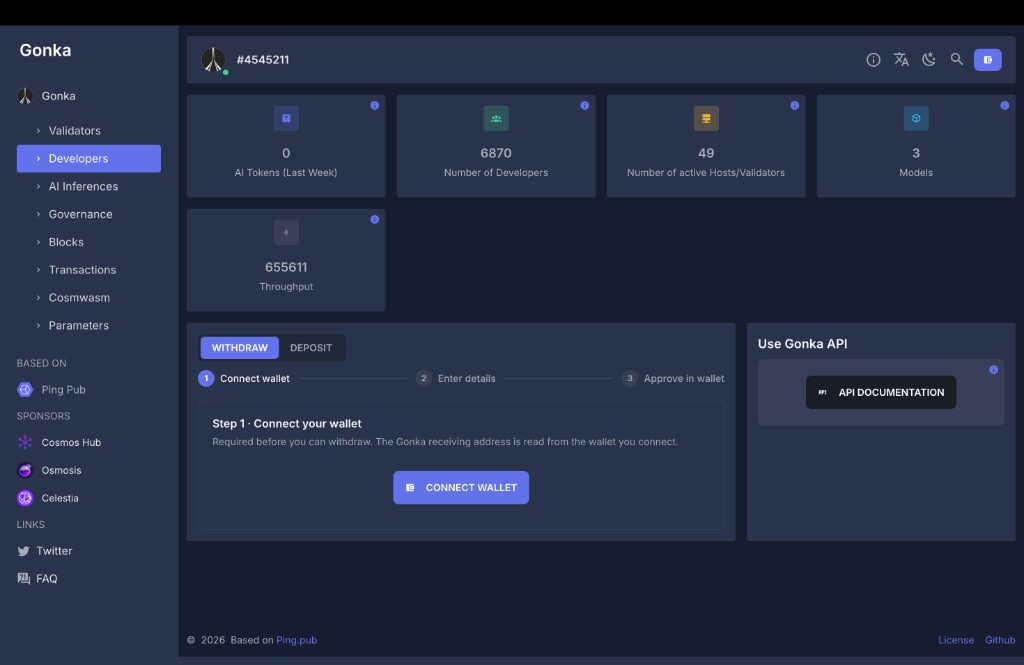
1. Open the dashboard
Open one of the genesis nodes in your browser:
Navigate to the Developers section in the left sidebar. You will see the bridge widget at the bottom of the page with WITHDRAW / DEPOSIT toggles.
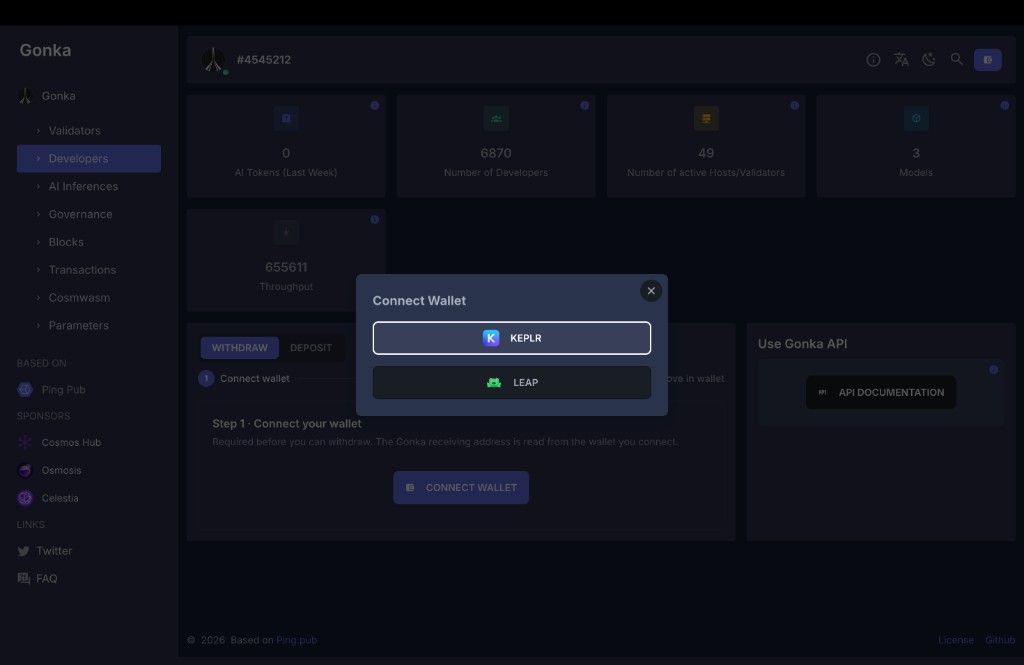
2. Connect your Keplr wallet
Make sure the DEPOSIT toggle is selected. Click CONNECT WALLET.
A dialog will appear with the available wallet options. Select KEPLR.
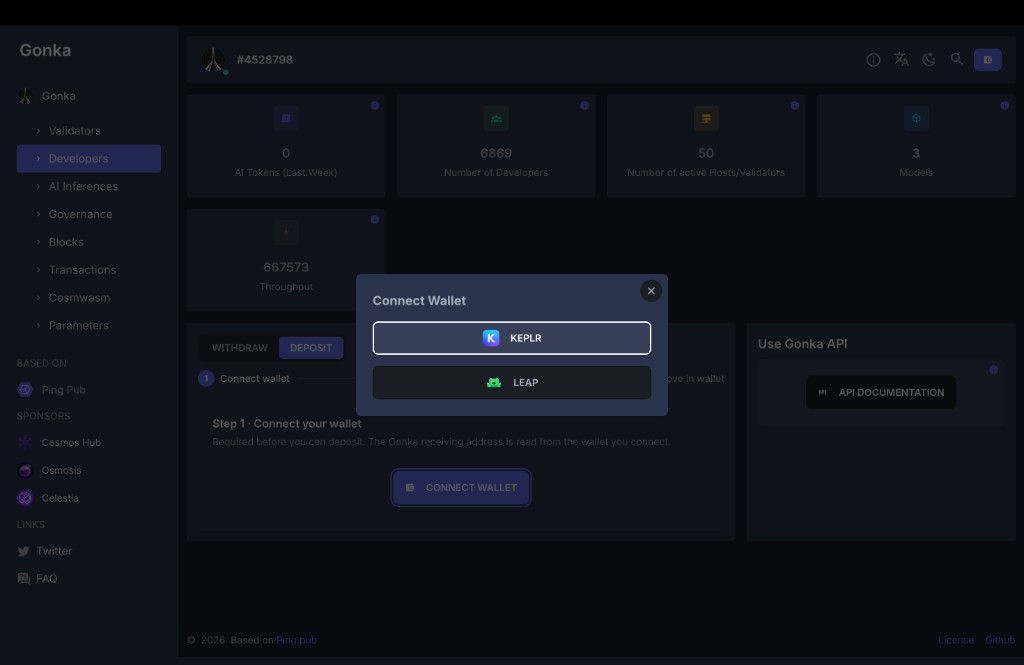
Keplr shows "Not Installed"?
If you see a "Not Installed" message, you need to install the Keplr browser extension first. Follow the instructions in Create a Gonka account → Keplr browser extension to set it up, then return here.
Enter your Keplr password if prompted. Once connected, the widget will show Keplr Connected with your shortened Gonka address and your GNK balance. Click CONTINUE to proceed.
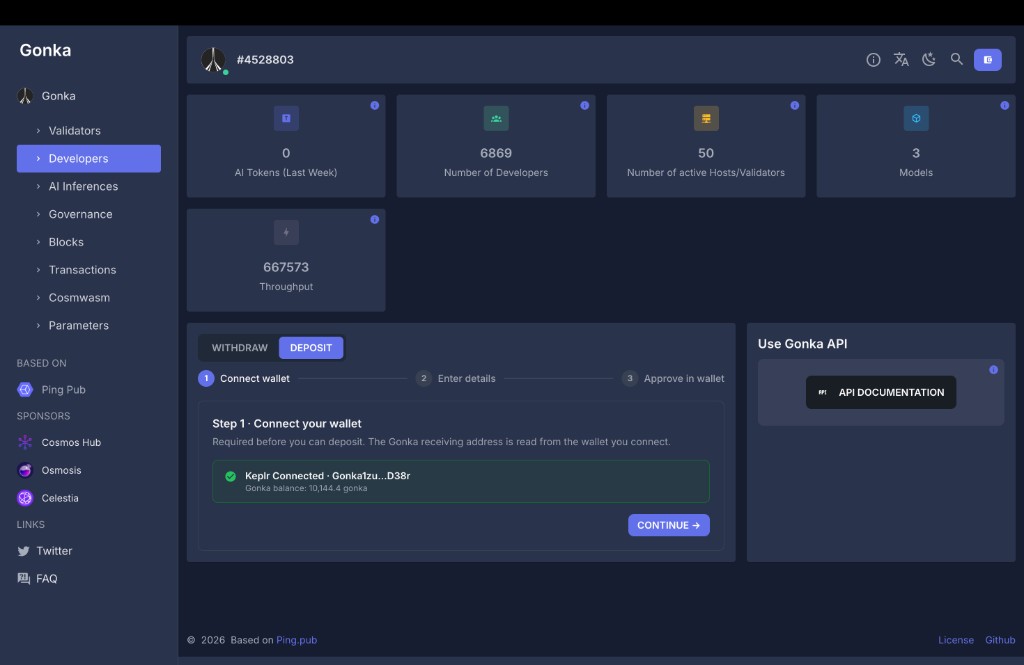
Seed-phrase (mnemonic) accounts
If your Gonka account was created from a seed phrase (mnemonic) rather than a raw private key, the bridge widget will detect the address mismatch and warn you. This happens because Ethereum and Gonka derive different keys from the same seed phrase, so tokens will be delivered to a different gonka1… address than your wallet currently shows. The funds are not lost — you can derive the matching key from the same mnemonic — but it requires a manual derivation step. If you see this warning, stop and read Addresses and keys before proceeding.
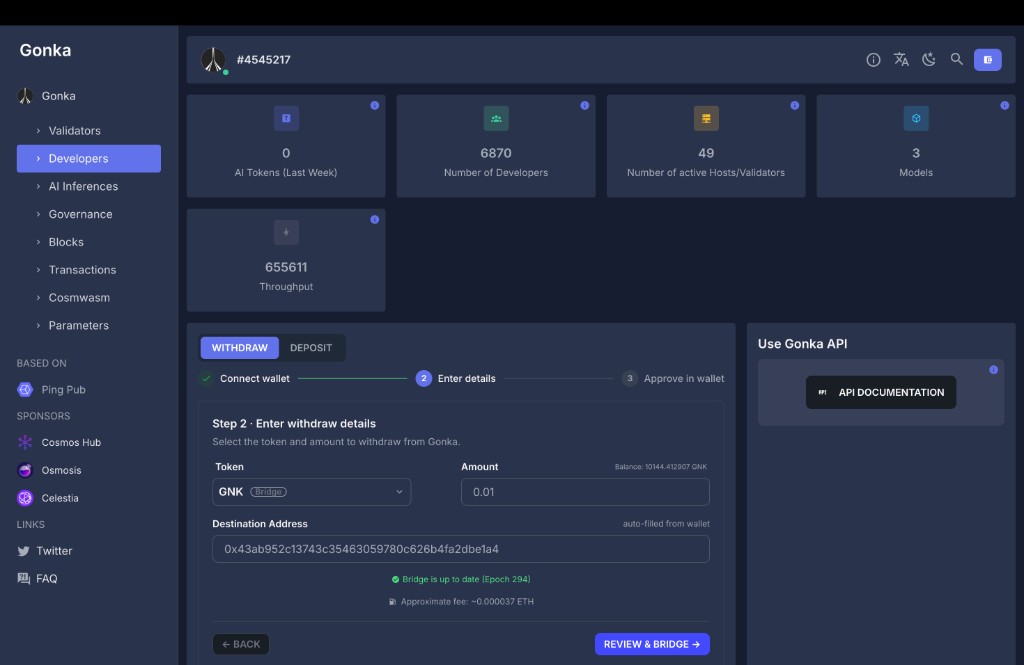
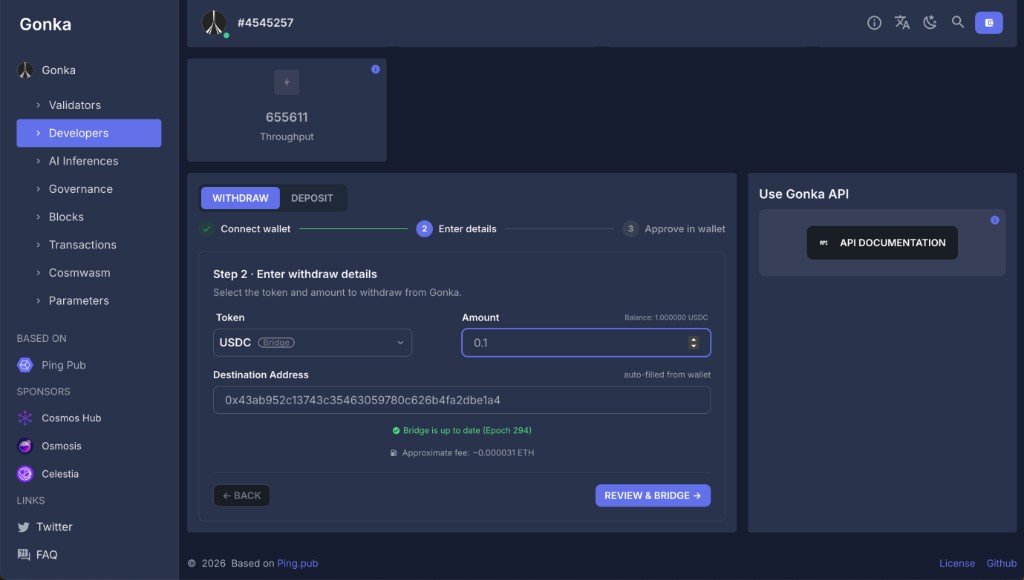
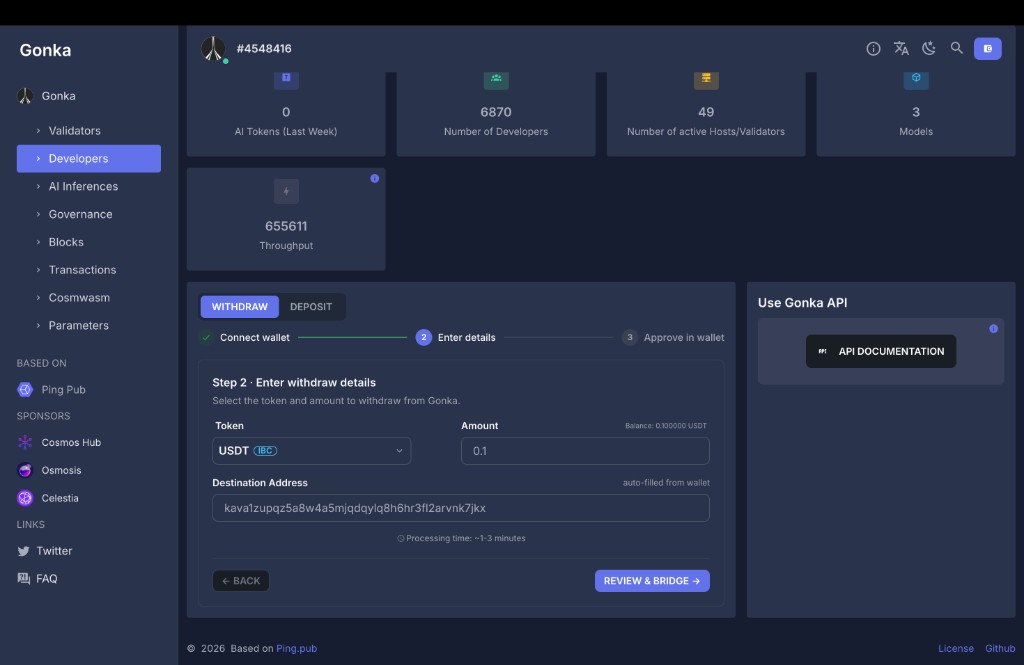
3. Choose token and amount
On Step 2, select the token you want to deposit from the Token dropdown and enter the Amount. The widget displays your current balance and the Receiving address on Gonka is auto-filled from your connected wallet.
The widget shows the estimated processing time and approximate fee (the fee currency depends on the bridge type — see the table above).
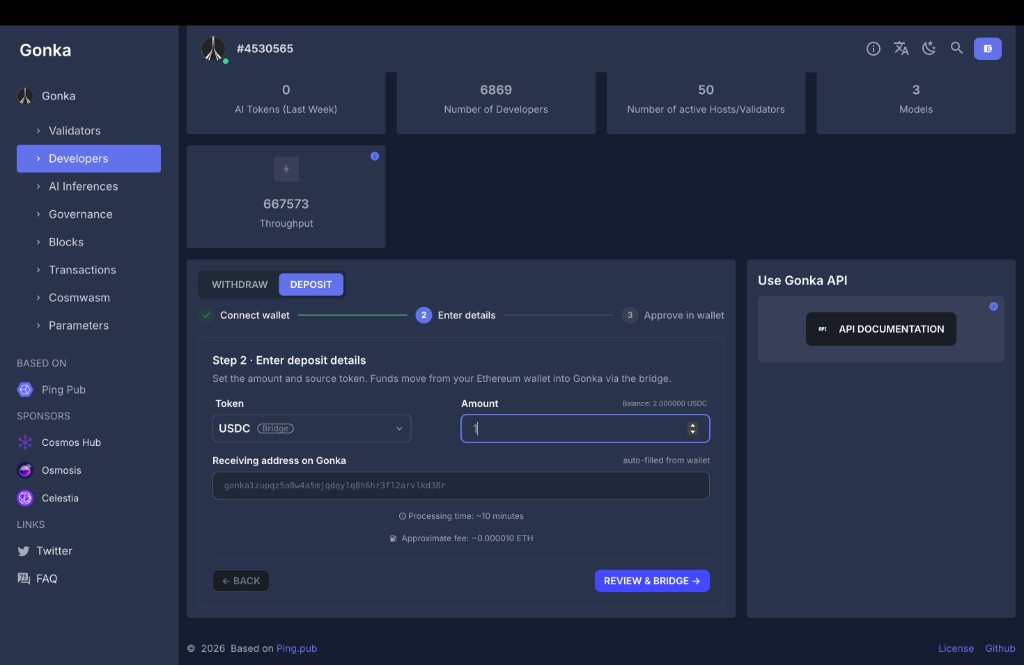

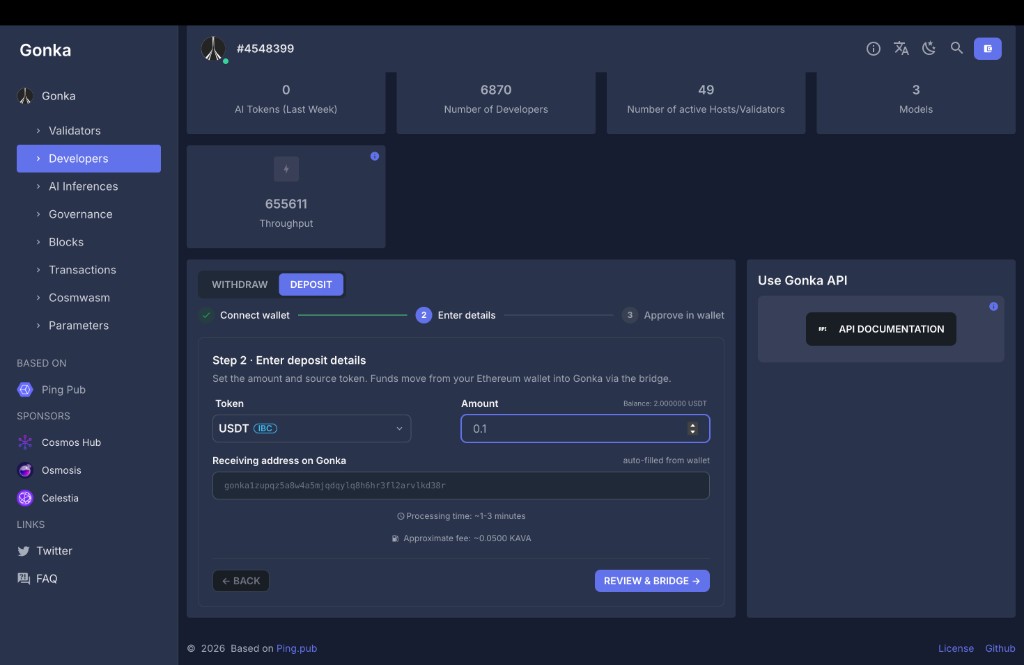
Click REVIEW & BRIDGE.
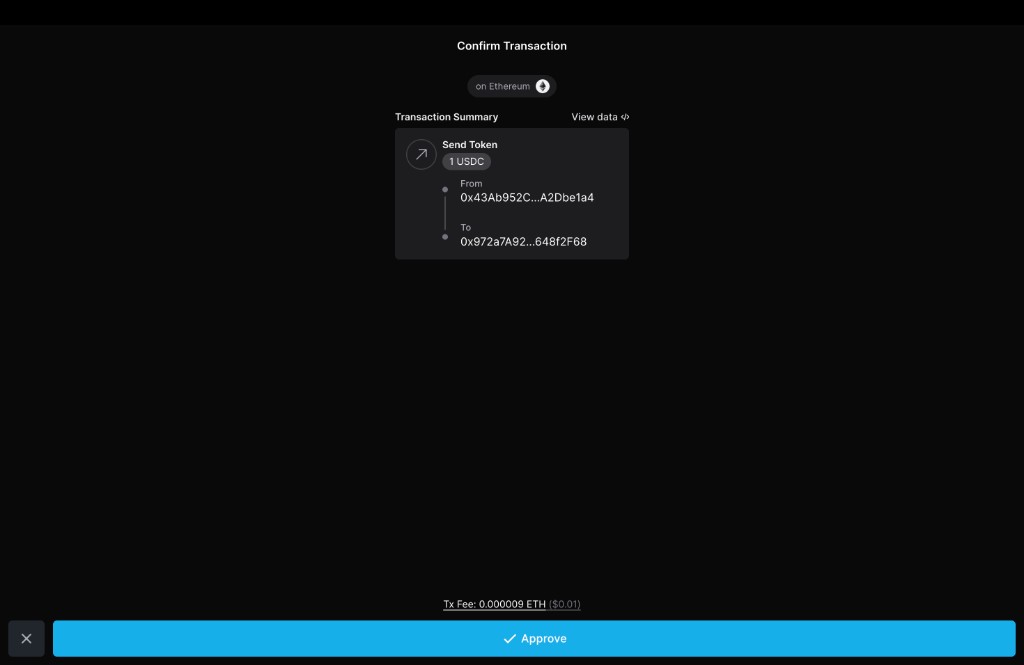
4. Confirm the transaction
Your wallet will open a Confirm Transaction screen. Review the details carefully before approving:
- Token and amount — verify the correct token and amount.
- From — your Ethereum address (the sender).
- To — the bridge contract address (
0x972a7A92…648f2F68). This is expected — you are sending tokens to the bridge, which will then mint wrapped tokens on Gonka. - Tx Fee — the Ethereum gas fee you will pay.
- Token and amount — verify the correct token and amount.
- To — the bridge contract address.
- Tx Fee — the Ethereum gas fee.
- Message type —
IBC Transfer. - Amount and destination — e.g. "Send 0.1 USDt to gonka1… via channel-161".
- Tx Fee — paid in KAVA (e.g. 0.05 KAVA).
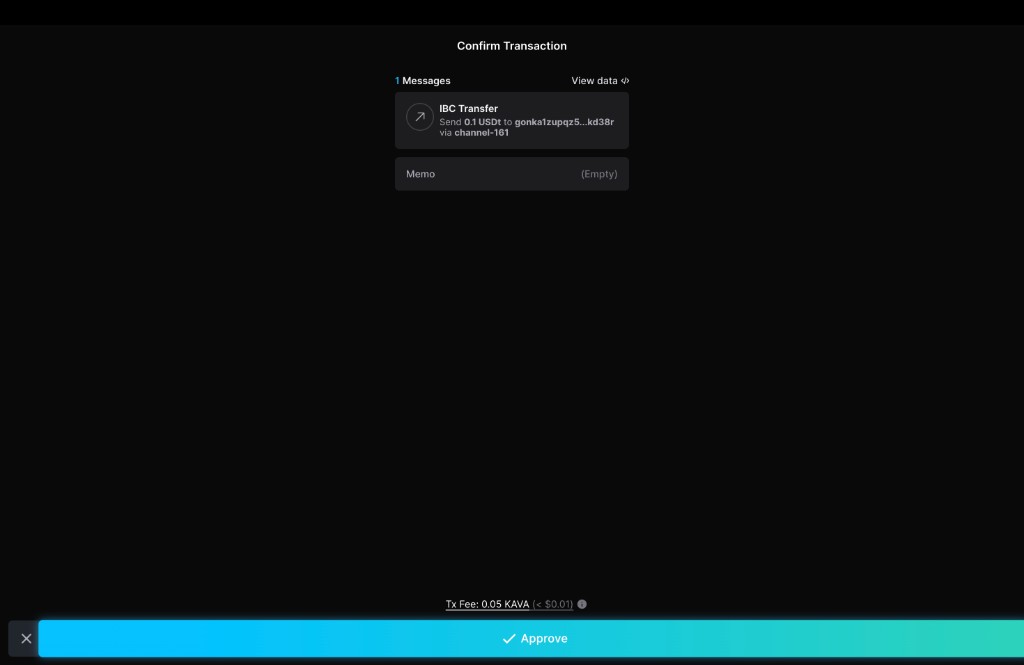
Click Approve to submit the transaction.
Warning
Double-check the details before confirming. Bridge transfers are irreversible. If anything looks wrong, click ✕ to cancel and start over.
5. Deposit complete
The widget will show a Deposit complete screen with a summary of the operation.
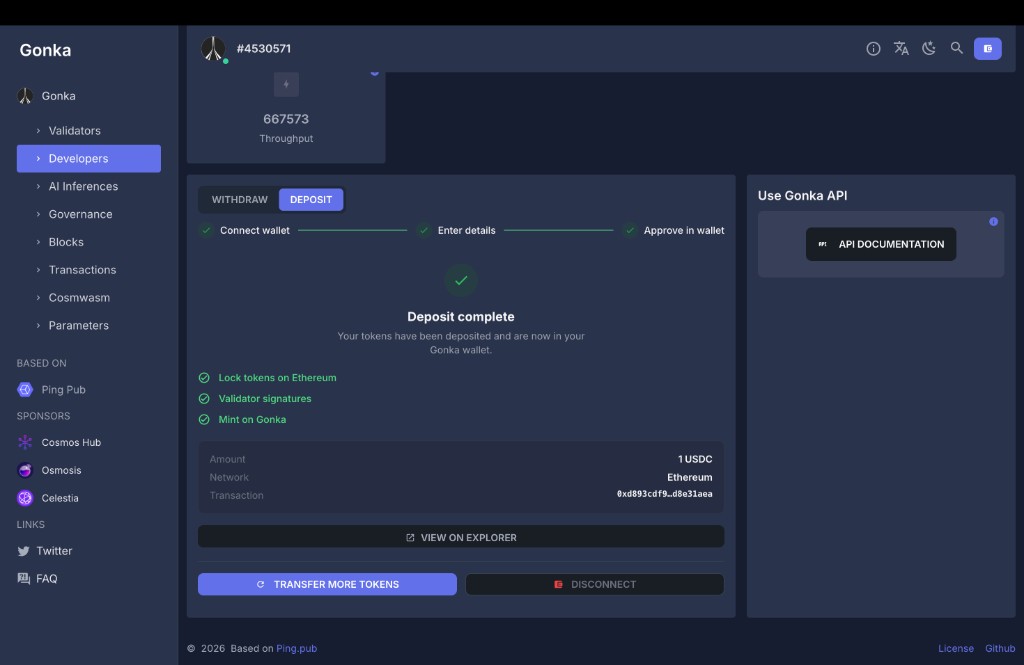
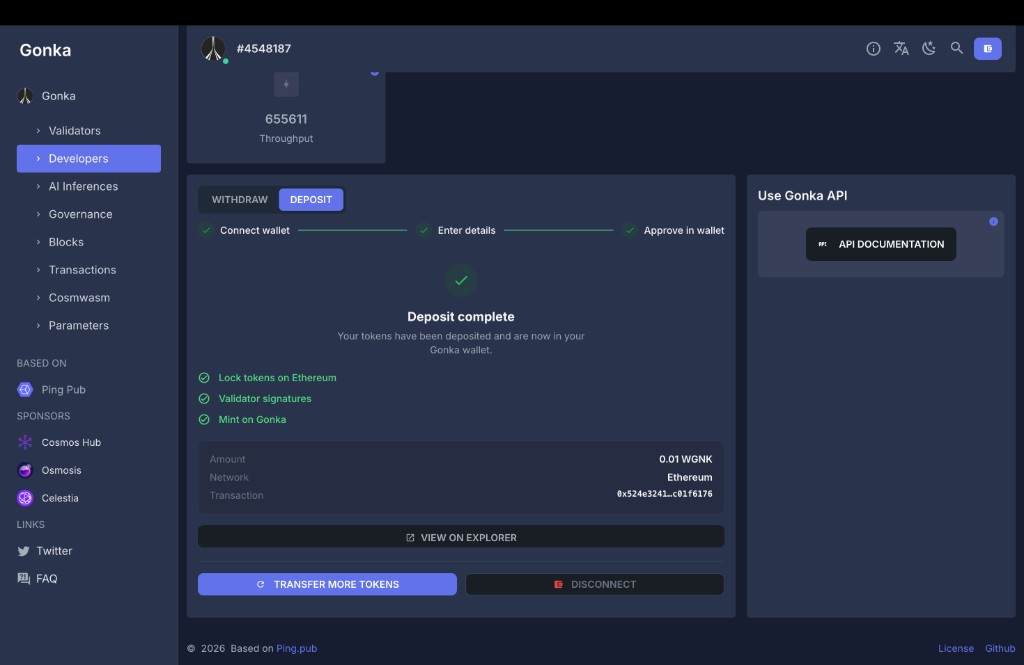
The progress tracker shows:
- Approve transfer in wallet — done
- IBC packet relay transfer — done
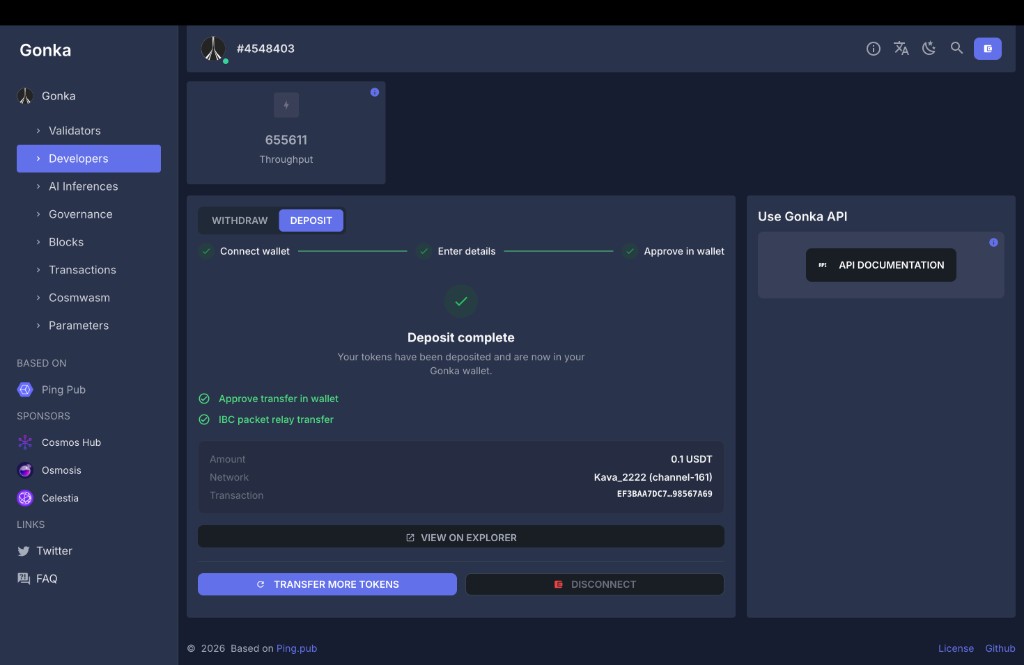
From this screen you can:
- Click VIEW ON EXPLORER to see the transaction details.
- Click TRANSFER MORE TOKENS to make another deposit.
- Click DISCONNECT to disconnect your wallet.
6. Verify your deposit
You can confirm your wrapped tokens arrived in several ways:
- In the dashboard: open
https://node2.gonka.ai:8443/dashboard/gonka/account/<your_gonka_address>and check your balances. - Via the transaction link shown on the Deposit complete screen.
- In Keplr: wrapped tokens (CW-20) do not appear in Keplr automatically — follow the steps below to add them manually.
Add wrapped tokens to Keplr
Wrapped ERC-20 tokens (such as wUSDC and wUSDT) are CW-20 tokens on the Gonka chain. Keplr does not detect CW-20 tokens automatically, so you need to add them as custom tokens.
Note
IBC tokens (transferred via IBC, not the Ethereum bridge) appear in Keplr automatically. The manual steps below are only needed for bridge-wrapped CW-20 tokens.
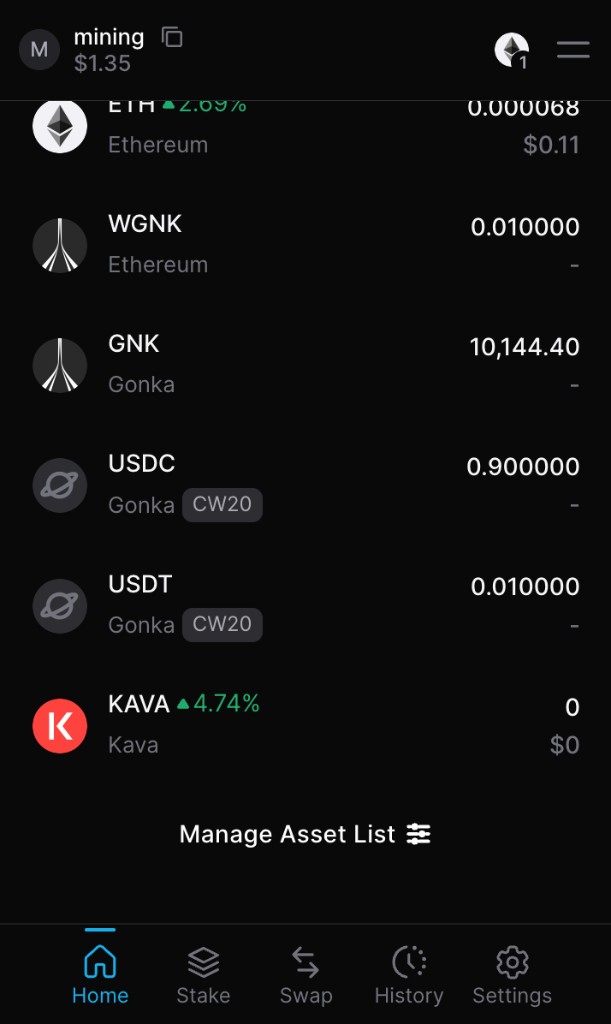
Step 1. Open your Keplr wallet, click the menu icon (three horizontal lines) in the top-right corner, and select Manage Asset List.
Step 2. Click the + button in the top-right corner to add a custom token.
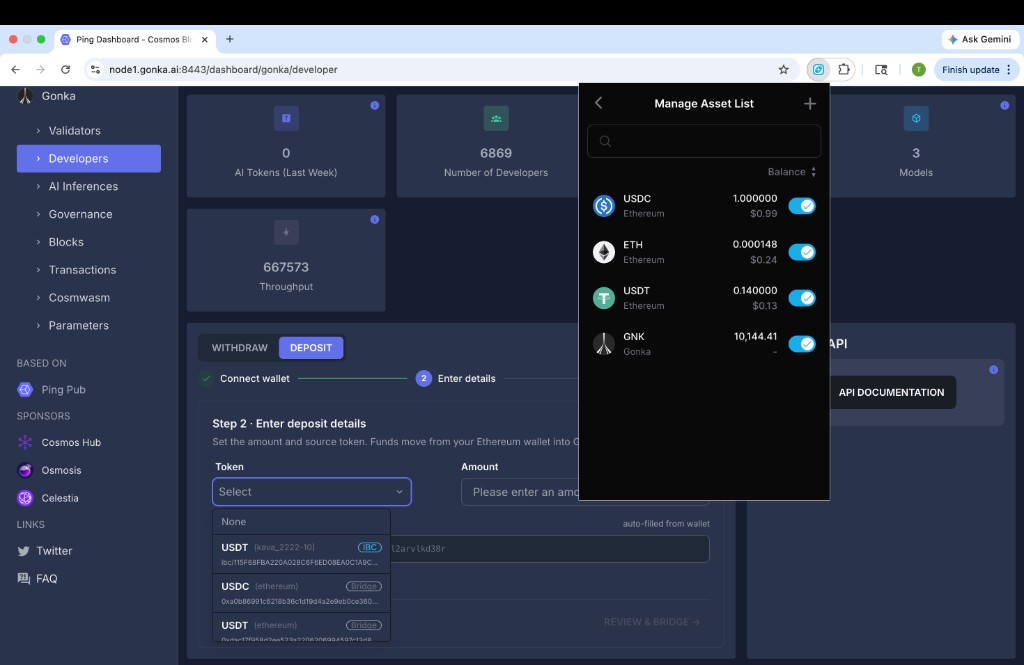
Step 3. On the Add Custom Token page, select Gonka from the chain dropdown. Paste the CW-20 contract address into the Contract Address field. The token metadata (name, symbol, decimals) will be filled in automatically. Click Confirm.
Known contract addresses:
| Token | CW-20 contract address on Gonka |
|---|---|
| USDC | gonka1fa83z7np903k9vh63guy82qthtv373d7vjeq0y7xeqh50rzn8vtssffkre |
| USDT | gonka15ggwj9un6qrmu4nj5ev6l7kpdcr00td03ff2mmj4cyhl8u8vjd2qnl3hgk |

Step 4. Done — the token now appears in your Keplr wallet as a Gonka CW20 token.
Withdraw tokens from Gonka
This section walks you through withdrawing tokens from Gonka using the bridge widget. Select the token from the Token dropdown — the widget detects the bridge type automatically:
- ERC-20 tokens and GNK go through the Ethereum bridge.
- IBC tokens (USDT IBC, …) go through IBC to a connected Cosmos chain.
How ETH / GNK bridge withdrawals work
- Burn tokens on Gonka — the wrapped token is burned (or native GNK is locked) on the Gonka chain.
- Validator signatures — Gonka validators produce a BLS aggregate signature authorizing the release.
- Release on Ethereum — the original token is released from the bridge contract on Ethereum (or WGNK is minted).
How IBC withdrawals work
- Approve transfer in wallet — you sign an IBC transfer on Gonka.
- IBC packet relay — the packet is relayed to the destination chain.
- Tokens arrive — IBC tokens appear in your wallet on the destination chain (e.g. Kava).
1. Open the dashboard
Open one of the genesis nodes in your browser:
Navigate to the Developers section in the left sidebar. Select the WITHDRAW toggle in the bridge widget.
2. Connect your Keplr wallet
Make sure the WITHDRAW toggle is selected. Click CONNECT WALLET.
A dialog will appear with the available wallet options. Select KEPLR.
Keplr shows "Not Installed"?
If you see a "Not Installed" message, you need to install the Keplr browser extension first. Follow the instructions in Create a Gonka account → Keplr browser extension to set it up, then return here.
Enter your Keplr password if prompted. Once connected, the widget will show Keplr Connected with your shortened Gonka address and your GNK balance. Click CONTINUE to proceed.

Seed-phrase (mnemonic) accounts
If your Gonka account was created from a seed phrase (mnemonic) rather than a raw private key, the bridge widget will detect the address mismatch and warn you. This happens because Ethereum and Gonka derive different keys from the same seed phrase, so tokens will be released to a different Ethereum address than your wallet currently shows. The funds are not lost — you can derive the matching key from the same mnemonic — but it requires a manual derivation step. If you see this warning, stop and read Addresses and keys before proceeding.
3. Choose token and amount
On Step 2, select the token you want to withdraw from the Token dropdown and enter the Amount. The widget displays your current balance of that token on Gonka. The Destination Address is auto-filled from your connected wallet.
Tip
Unlike deposits, you can edit the destination field to withdraw to a different address. Make sure it's an address you control and that it's entered correctly.
The destination address is a kava1… address on the Kava chain. Processing time is ~1–3 minutes.
Click REVIEW & BRIDGE.
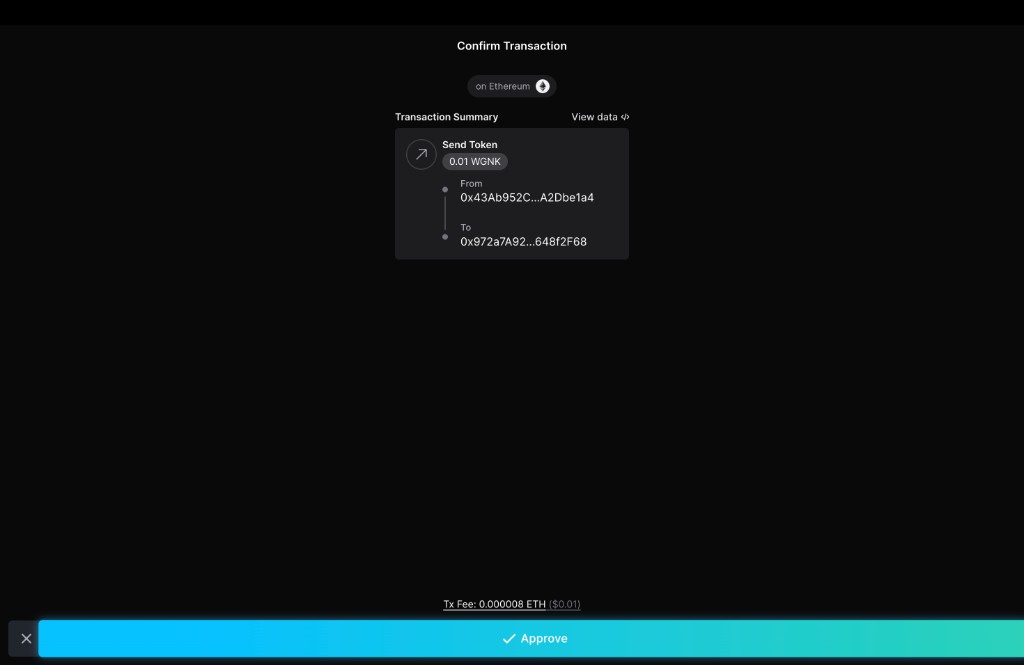
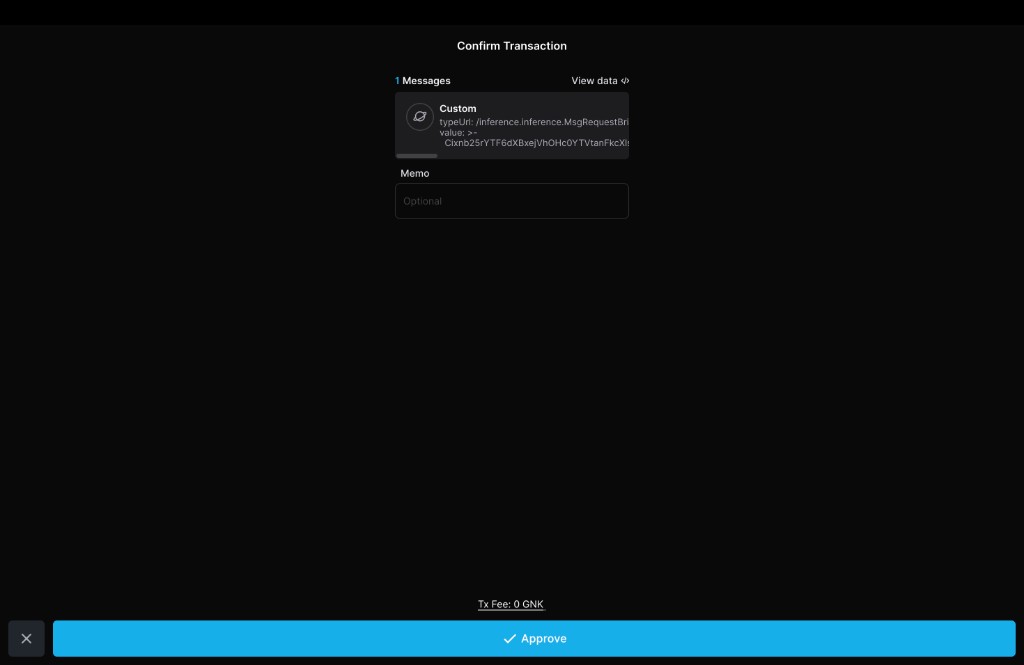
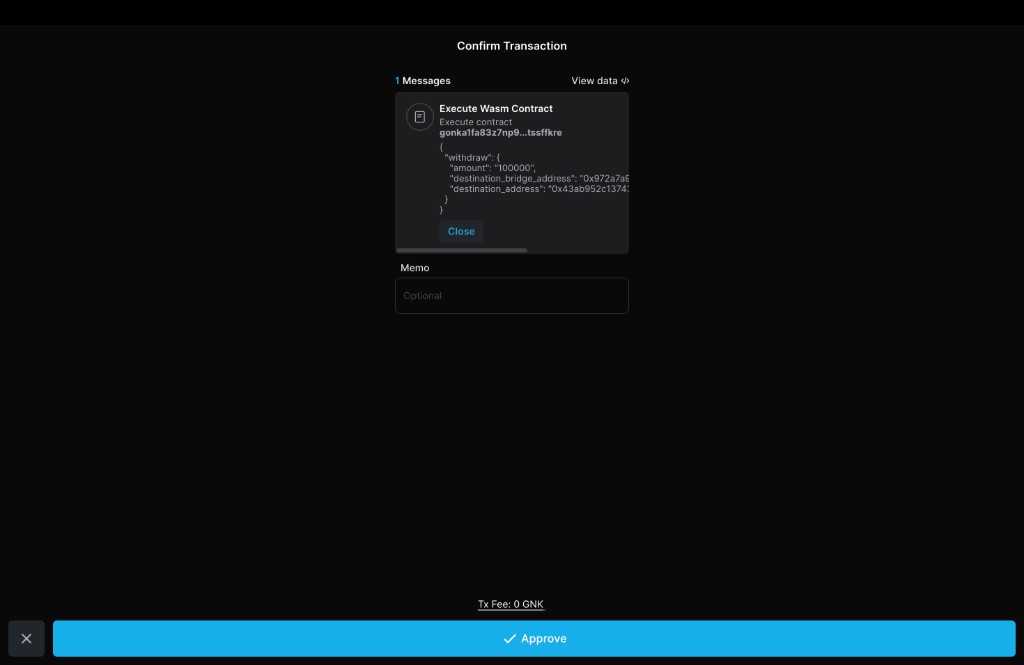
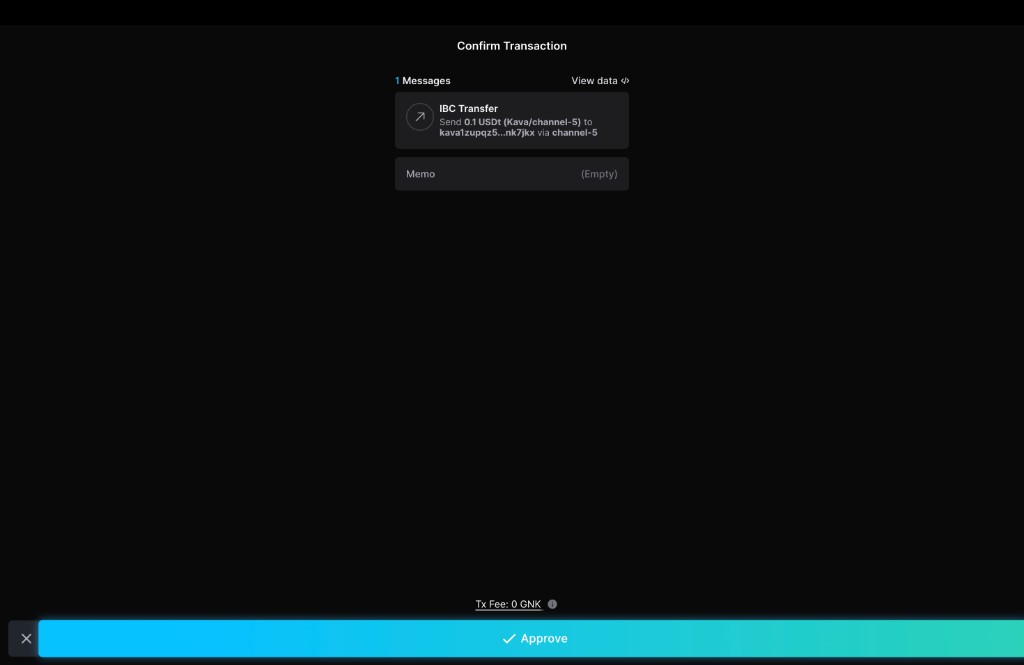
4. Confirm the transaction on Gonka
Keplr will open a Confirm Transaction popup for the Gonka chain. Review the details and click Approve.
- Message type —
MsgRequestBridgeMint, which locks your GNK on Gonka and requests minting of WGNK on Ethereum. - Tx Fee — 0 GNK.
- Message type —
Execute Wasm Contractcall to the wrapped token's CW-20 contract with awithdrawpayload. - Tx Fee — 0 GNK.
- Message type —
IBC Transfer. - Amount and destination — e.g. "Send 0.1 USDt (Kava/channel-5) to kava1… via channel-5".
- Tx Fee — 0 GNK.
Warning
Double-check the details before confirming. Bridge transfers are irreversible. If anything looks wrong, click ✕ to cancel and start over.
For ETH / GNK bridge: after you approve, the progress tracker marks Burn tokens on Gonka as complete. The Gonka validators then automatically collect and aggregate their BLS signatures (Validator signatures step) — no action is required from you during this stage.
5. Confirm the release transaction on Ethereum (ETH / GNK bridge only)
Note
This step applies only to ETH bridge and GNK bridge withdrawals. For IBC withdrawals, the transfer completes automatically after Step 4 — skip to Step 6.
Once the validators have produced the BLS aggregate signature (Validator signatures — done), Keplr opens a second popup — this time for the Ethereum chain. This transaction executes the bridge contract (0x972a7a92…648f2f68) to release the tokens on Ethereum.
- To — the bridge contract address on Ethereum.
- Tx Fee — the Ethereum gas fee (paid in ETH). The exact amount depends on current gas prices.
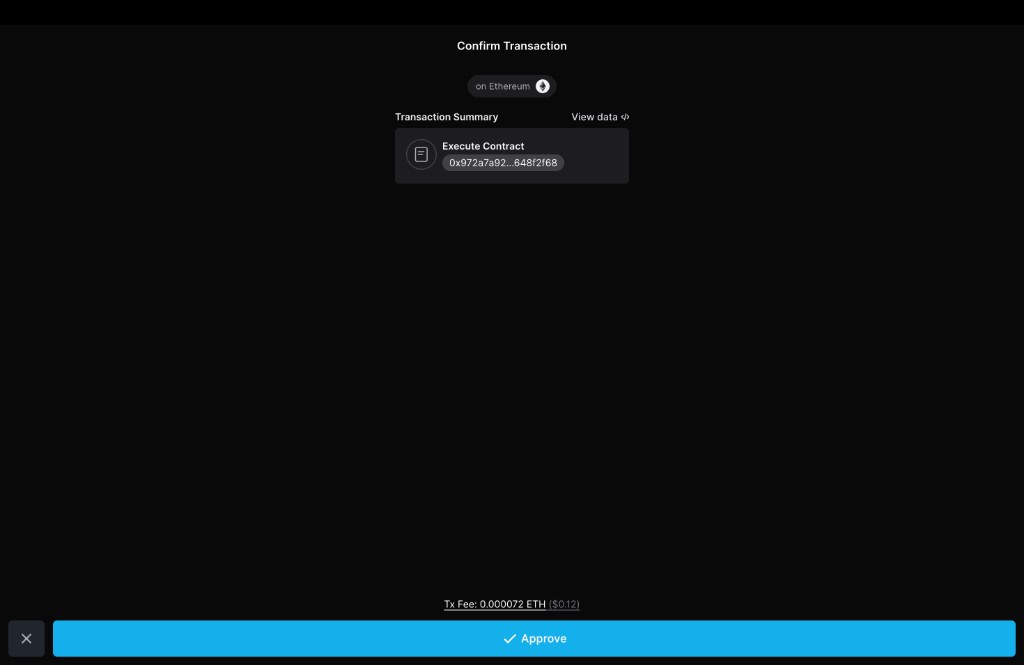

Click Approve to submit the release transaction.
6. Withdrawal complete
The widget shows a Withdrawal complete screen with all stages marked as done.

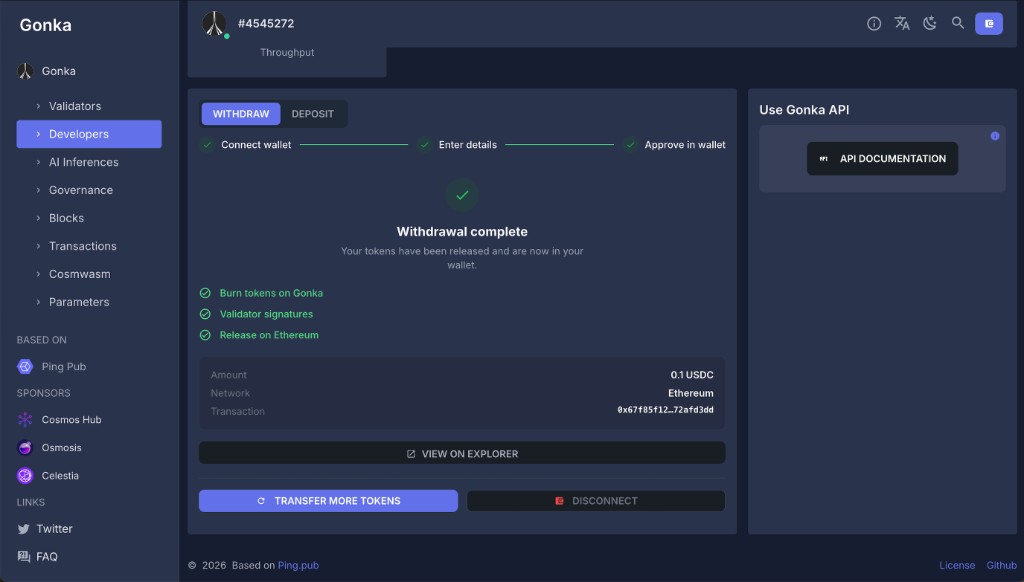
The progress tracker shows:
- Approve transfer in wallet — done
- IBC packet relay transfer — done
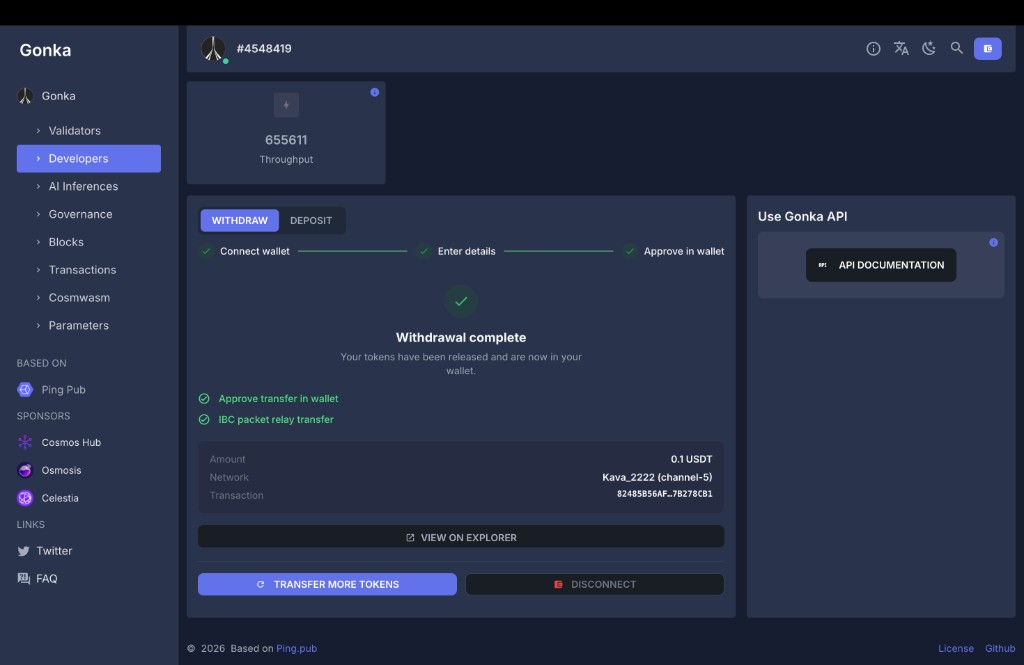
From this screen you can:
- Click VIEW ON EXPLORER to see the transaction details.
- Click TRANSFER MORE TOKENS to make another withdrawal.
- Click DISCONNECT to disconnect your wallet.
7. Verify your withdrawal
You can confirm your tokens arrived in several ways:
- ETH bridge / GNK: check the released ERC-20 tokens or WGNK in your Ethereum wallet. WGNK appears in Keplr automatically.
- IBC: check the token balance on the destination chain (e.g. USDT on Kava in Keplr).
- Explorer link: use the VIEW ON EXPLORER link on the Withdrawal complete screen.